Make the data of an area on your computer
duckosm studio starts a page on your computer. The page makes the data of an area in steps. Then it shows the map of the new
area, with the panels Edit OSM data and Edit levels. The steps are the steps of duckOSM Studio, the
page that runs in a browser. The two pages use the same parts of duckOSM (web/build_steps/ and web/ground_step/).
The two pages are duckOSM's two versions:
- Offline:
duckosm studio(this page). The program on your computer builds the area into a.duckdbfile on the disk. Its limit is DuckDB'smemory_limit(options.memory_limit) and the disk, so it is for a large area. - Online: duckOSM Studio in the browser. The browser builds the area. Its limit is the memory of the tab (later: the browser disk, OPFS).
Offline and online builds shows each step of the build in each version, and where it keeps its data.
The difference: here the build runs on your computer. It is duckosm build, so the area can be as large as your computer can build, and the
result is a .duckdb file on your disk.
Start
duckosm studio areas
Open the address that the command prints (http://127.0.0.1:8792/). The page opens in the browser by itself when the computer has a desktop;
--no-open stops this. Each area is made in its own folder, areas/<name>/. The page answers only on this computer. Ctrl+C stops it.
The page and its server are Rust. duckosm-rust studio is the program: the build is the native Rust engine, with no Python. duckosm studio is the same page for the Python package, and its build is
duckosm build (the Rust engine and the Python steps); it is the cross-check of the Rust build.
The steps
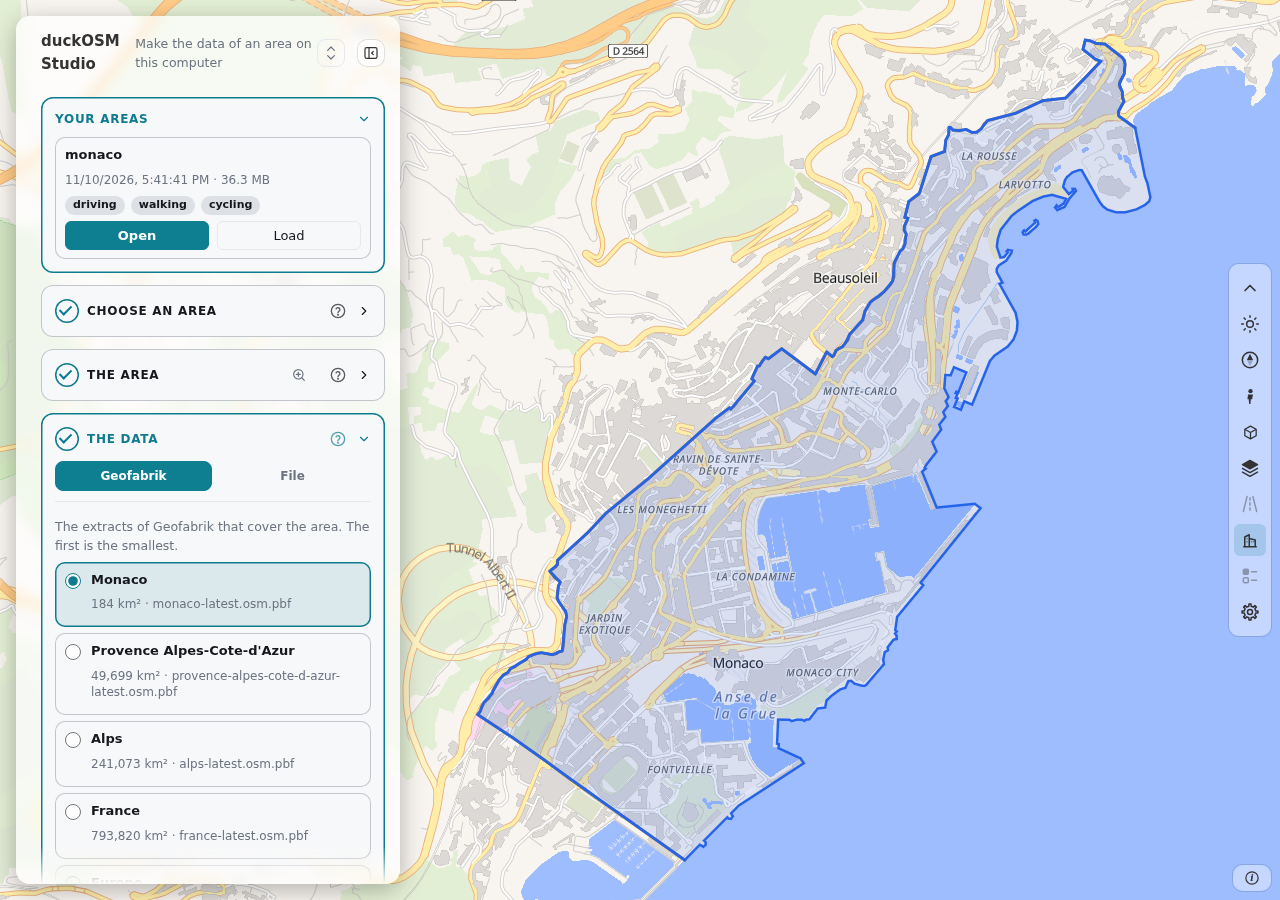
The page is roadstyle's dashboard, and the cards are the cards of Studio: a round number (a check mark when the step is done), the title, a "?" with its help, and the line "after step N" for a step that is not ready. One step is open at a time, and the next step opens when the one before is done. Step 6 (Ground) is the one that Studio has only as a folded box in its Build card.
- Choose an area. Search a place, draw shapes, open a GeoJSON file, click hexagons, or use "What is here?" (the target in the search field) and click the map:
- Search. Type the name of a place: the matches show while you type (the names from Photon, the outlines from Nominatim), and you pick one. The outline of the place under the mouse shows on the map, and a second click on the picked place takes the area away. A place with no outline is listed with no choice. The page needs the internet for this.
- Draw. The tools of Studio: rectangle, polygon, circle, freehand and select (move a shape, or change its corners), with Merge (the shapes that overlap), Delete and Clear. The keys R, P, C, F and S pick a tool. The shapes together are the area.
- File. Drop a GeoJSON file with a polygon or a multipolygon, for example the file of
duckosm boundary. - H3. Choose the size of a hexagon (the levels 5 to 10), then click the hexagons on the map; the hexagons together are the area (at most 500 cells and 5,000 km²). A click on a picked hexagon removes it. You can also type H3 cell IDs in the search box.
- The area. The name (it is the name of the folder of the area), Buffer around the area (0 to 50,000 m: the area grows on all sides, in the UTM zone of its centre, as
boundary.buffer_mof duckOSM does; the server does it with DuckDB), the numbers (area in km², polygons, vertices), Boundary (saves the boundary as a GeoJSON file) and Unselect. The magnifier moves the map to the area. - OSM data. The tab Geofabrik shows the extracts of Geofabrik that cover the whole area, the smallest first. A click on an extract chooses it and
shows it on the map; a second click deselects it. Download puts the extract into
OUT_DIR/osm/, with a progress bar under its name. Then the button is Use, or In use for the extract of the build. One extract serves every area that it covers, and the build does not download. The tab File takes the path of a.osm.pbffile on this computer. The build cuts the file to the area. - Build. The networks and the options (the keys of the config of
duckosm build; open Config of the build to see the text), Fixes (the path of a fixes file on this computer: the keyosm_overrides), and the button Build. The page shows the steps, and the time of each one. The build writesOUT_DIR/<name>/<name>.duckdb, the config it used (config.yaml) and the boundary (boundary.geojson). Then the map of the page shows the new area: its roads with their levels and the layers of the database, on a blank base map, with only the line of the boundary. The page does not load again: the server gives the map of the area as roadstyle's way D (roadstyle local): the tiles, the fields and the line of a road that you click, and the queries over the area's.duckdbfile. The page keeps no table of the roads. - The result. The networks that the build made, and the files in the folder of the area.
- Ground. The height of the ground (a DEM) of the built area. The page lists the DEM sources that cover the area, best first. The row that you choose has the
web page of the source, and its state under the name. Download puts the files of the area into
OUT_DIR/dem/<source>/: the 1° tiles of Copernicus GLO-30 and GLO-90, or the part of the area of NRCan HRDEM (the server reads only that part of NRCan's cloud file, and converts it from EPSG:3979 to EPSG:4326). Then the button is In use. A file that you put into that folder yourself is used too. Or drop another file in the box. The product, the vertical datum and the licence of the file are the source's, and the ground id is the SHA-256 of the file. Add the ground builds the area again with the DEM (the same OSM data and settings). The 3D terrain of the map is then the area's own ground, not the AWS Terrain Tiles. Read The ground reference and Add elevation. -
Edit OSM data. The card opens the panel Edit OSM data of the area: the page of
duckosm edit. Each change goes intoOUT_DIR/<name>/osm_fixes.yaml, and Build again builds the area again with the file. Its back button comes back to the steps, with the area open. The map of an open area has the 3D walls by type (front, back, side, party, court; the toolbox's 3D buildings, then the walls style of card Edit design) when the area hasmain.building_faces: the build's option Wall labels (on by default) makes it, with the base-map layers. The server cuts the walls into tiles of the area's map when they first show. An area built before this option was on has no walls: build it again. -
Edit levels. The card opens roadstyle's level editor over the map of the open area: the drawing order of the roads at bridges and tunnels (the same editor as card 8 of duckOSM Studio). Each change draws the changed roads again at once: the server redraws them. ← Steps closes the editor and writes the change into the area's
.duckdbfile (visualization.edge_levels,edge_levels_meta,level_edits,level_headsandlevel_caps). The area must have levels: the option levels of the build is on by default. The editor needs every road of the area, so it borrows the area's road table from the server while it is open. It runs in the page with roadstyle's WebAssembly package. The program has the package only whenrust/duckosm-edit/editor_pkg.shran before its build. Without the package, the card says so.
Studio has two more ways to get the OSM data (Overpass, and a cut file that you open in the browser). They are not here: the build reads a Geofabrik extract or a file on this computer.
Your areas
The areas are files on your disk, in OUT_DIR/<name>/. A new visit of the page lists them in the card Your areas (as Studio lists the areas that it keeps in the browser).
For each area the card shows the date, the size, the networks and whether it has a DEM, with two buttons. The outline of the area under the mouse shows on the map.
- Open shows the area: its map page (the roads with their levels and the layers of the database, on a blank base map), with the panel Edit OSM data. The
back button of that page comes back to the steps, with the area in them: its boundary and settings, its row selected, its result in step 6. To build it again,
choose the OSM data and the ground, change what you want, and click Build.
Open answers at once. The map page of the area is kept in
OUT_DIR/<name>/<name>.map.html: the build writes it, and Open reads it, so the map is ready at once. The server makes the page again only when the database changed (Burnaby: about 13 s, in the background; step 7 says "Preparing the map" until it is ready). - Delete deletes the folder of the area and all its files, after you confirm. The downloaded extracts (
OUT_DIR/osm/) and DEM files (OUT_DIR/dem/) stay.
On a phone
The panel is a sheet at the bottom and the map is above it. Draw the box on the map, then use the steps in the sheet.
Options
| Option | Does | Default |
|---|---|---|
OUT_DIR |
the folder of the areas | the current folder |
--port INTEGER |
the port of the page on 127.0.0.1 | 8792 |
--geofabrik-index URL_OR_FILE |
the list of the extracts, for a mirror or a test | https://download.geofabrik.de/index-v1.json |
--no-open |
do not open the browser | off |
Limits
- The Rust build makes the base-map layers (
features.*), the H3 columns and, with the setting Sea,features.ocean. It makes nomain.boundary_cells, checks, report, maps or multimodal graph. The Python build (duckosm studio) makes them. - The page builds one area at a time.
- A DEM file that you drop is at most 16 MB. The downloaded files of a model have no limit.
- Download is for Copernicus GLO-30 and GLO-90 and NRCan HRDEM. The other models need an account, or the server cannot read their files yet.
- The page does not stop a build that runs. Stop the command, then start it again.